Thursday, March 31, 2011

How To: Make Cream Cheese and Whey


I use whey quite a bit now and have been asked where I get it. I make it and you can too! Easy!

You can start with raw milk, or you can also use plain yogurt.

If you are using raw milk start with Step 1, plain yogurt - skip to Step 2.

Step 1:
Fill a quart jar with the raw milk, screw on the lid and let it sit on the counter at room temperature for 1-4 days. When it has separated (clear liquid on top, white on bottom) you will be ready for Step 2.
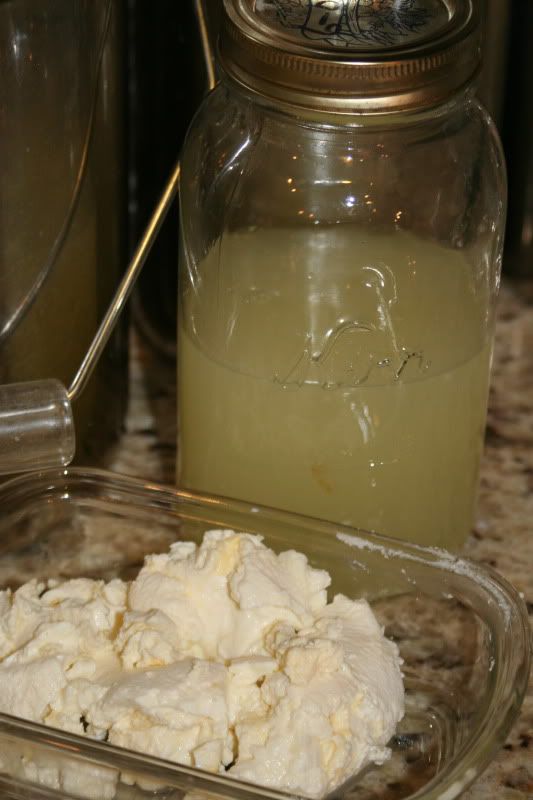
Step 2:
Line a strainer set over a bowl with a clean tea towel. Pour in the yogurt or separated milk, cover and let stand at room temperature for several hours. The whey will run into the bowl and the cream cheese will be in the towel. Gently tie up the towel with a string and let hang over the bowl until all the whey has dripped out. Store your whey in a glass jar and cream cheese in a covered container in the fridge. The (cultured!) cream cheese will keep for about a month and the whey for about 6 months.

I will be sharing various ways I use my whey (ha!) in future posts. Enjoy the benefits of live bacteria by eating your homemade cream cheese raw. Sweeten it with some raw honey and you'll have a delicious spread for sprouted bagels!

Sunday, March 27, 2011

Homemade Ranch Dip Mix

No MSG, fillers, preservatives or other yucky stuff in here! This is the best mix recipe I've found that comes close to that "Hidden Valley" taste. Use at least 1 tablespoon of mix per 1 cup of cultured sour cream to make a healthy (probiotic!) dip for your raw, organic veggies. Or use about 2 tablespoons of the mix when a recipe calls for a 1 oz. packet of ranch dip mix.

1 1/2 T. parsley flakes
1/2 T. dried chives
1/4 T. dried tarragon
1/4 T. lemon peel
1/4 T. pepper
1 T. sea salt
1/4 T. dried oregano
1/2 T. garlic powder

Mix all ingredients together and store in an airtight container.

UPDATE:

Check out the ingredients from the Great Value (Wal-Mart brand) Ranch Dip container:

water, soybean oil, nonfat dry milk, modified cornstarch, whey, contains less than 2% of: salt, sugar, monosodium glutamate (MSG), dried garlic, dried onion, gelatin, mono- and diglycerides, lactic acid, natural flavor, artificial flavor, spices, potassium sorbate (preservative), titanium dioxide (color), guar gum, sodium phosphate, calcium carbonate, carrageenan, phosphoric acid, citric acid, chicken fat.

Guh-ross.

Wednesday, March 23, 2011

Product Review: Emerald Valley Organic Salsa


Salsa... I love salsa. I NEED salsa. This salsa is so very good. I'm not crazy about many store-bought salsas, I like to make my own. But this! this is really, really good. So until summertime comes and I can make my own (cultured - will share this later) salsa, this will definitely do. Emerald Vally Organic Salsa, go add it to your cart!

INGREDIENTS: Organic Tomatoes (Organic Tomatoes, Tomato Juice, Sea Salt, Citric Acid, Calcium Chloride), Water, Organic Apple Cider Vinegar, Organic Dehydrated Onion, Organic Cilantro, Sea Salt, Organic Jalapeno Peppers, Organic Garlic Powder, Organic Cumin Powder.

Chicken and Rice Casserole


I could eat this every day. Seriously. Everyone loves it and it is a cinch to make. I cut the wings, legs and thighs off a whole chicken; then cooked the rest of the chicken in a pot of water. Now I have dinner on the table plus nearly a gallon of homemade chicken stock and several cups of cooked chicken ready for another meal later on in the week. Here ya go!

2 cups brown rice
4 cups chicken stock
1 tbsp minced onion
1/2 tsp garlic powder
1 tsp oregano, dried
1 lb. frozen green beans
6-8 portions of bone-in, skin-on chicken
sea salt
pepper

Preheat oven to 350 degrees. Place your rice, stock, minced onion, garlic powder and oregano in a 9x13 glass dish. Stir to combine. Sprinkle the green beans evenly over the rice mixture. Lay your chicken pieces on top of the green beans, skin side up. Season the chicken with sea salt and pepper. Bake, uncovered, for 1 1/2 hours. Enjoy!

Just in case you were wondering, I eat the skin.

Monday, March 21, 2011

Product Review: Alden's Organic Blackberry Ice Cream


Oh, yes... This is some good ice cream! Jesse (a sweets fanatic) said, "I think this is the best ice cream I've ever had!" Smooth, creamy, perfect amount of blackberry...

We are enjoying our Alden's Organic Blackberry Ice Cream and I'm looking forward to sampling their seven other varieties - to report back to you of course! Somebody has to do it...

INGREDIENTS: Organic Cream and Organic Skim Milk, Organic Blackberries, Organic Evaporated Cane Juice, Organic Egg Yolks, Natural Flavors, Pectin, Citric Acid, Stabilizer (Locust Bean Gum, Guar Gum, Organic Evaporated Cane Juice).

Apple Crisp


Update: I have made this using brown rice flour instead of wheat and palm shortening instead of butter to make this allergen-free.  Worked great!

I bought 20 pounds of beautiful, organic apples from Azure Standard this month for $.75/pound! We've been enjoying our apples raw as well as in this crisp for a special treat. What a delicious way to use up some of the surplus! I found this recipe on about.com.

Apple Crisp

Serves 6

3 large Granny Smith apples, peeled, cored and very thinly sliced
2 tbsp lemon juice
½ cup unsweetened apple juice
½ cup rolled oats
½ cup sucanat
¼ cup hard white whole wheat flour
2 tbsp butter, cut into tiny pieces

Preheat oven to 400 degrees. Place sliced apples in an 8x8 glass baking dish. Drizzle with lemon juice. Pour all but 2 tbsp of apple juice over sliced apples.

Whisk oats, brown sugar and flour together. Rub butter pieces into oat mixture. Sprinkle on top of apples. Drizzle remaining apple juice.

Bake for 35 minutes, or until golden and bubbly.

Friday, March 18, 2011

Beef Stew

Tonight we are eating beef stew for dinner, yum! This is a slight variation of PW's Beef Stew. It would be great served with some delicious homemade bread, but kids have baseball tonight and life is busy!


Beef Stew
1 tbsp coconut oil
1 tbsp butter
1 lb stew meat
1 onion, diced
3 cloves of garlic, minced
6 cups of water
4 tsps beef base
1 tbsp Worcestershire sauce
2 tbsps tomato paste
1/2 tsp paprika
1/2 tsp sea salt
black pepper, to taste
1 1/2 tsp sucanat
5 whole carrots, roughly chopped
5 (fist sized) new potatoes, diced

Heat the oil and butter in a large pot over medium-high heat. Brown meat, set meat aside, cut into bite-sized pieces.

Add diced onions to the pot. Stir and cook for 2-3 minutes until softened, then add garlic for another minute. Pour in the water and add beef base, then add Worcestershire sauce, tomato paste, paprika, salt, pepper and sucanat. Add beef back to the pot. Stir to combine. Cover and simmer for 1 1/2 - 2 hours.

Add carrots and potatoes, then cover and cook for an additional 30 minutes.

Honey Whole Wheat Sourdough Bread

Step 1: Feeding the Starter


Pour off the liquid that accumulates on the top of the starter. Mix in 1 1/2 cups room temperature, filtered water and 1 1/2 cups white whole wheat flour. Stir well, cover with a towel and leave on the counter for about 12 hours.

Step 2: Making the Dough


2 cups sourdough starter
1 cup filtered water (room temp.)
2 tsp sea salt
1/2 cup honey
1/4 cup melted butter
4-5 cups hard white whole wheat flour

Place all ingredients except flour in stand mixer. Stir to combine. Add flour and start machine (with dough hook) on low. Once the dough starts to clean the sides of the bowl, set timer for 6 more minutes. Then let rest, covered with a towel, for 6 minutes.

Step 3: Shaping the Loaves


Take the dough out of the bowl and place on a clean, floured counter. Hand knead and shape into two loaves.

Place the dough in a well-greased and floured loaf pan. Cover and let rise in a warm place (for about 12 hours).


Place loaves in a cold oven. Set oven to 350 degrees and bake for 40 minutes. Cool on wire racks. Be sure and drop your stone loaf pan and spend the rest of the morning cleaning up shards from your kitchen and dining room floor. It would make me feel better. Really.


Wednesday, March 16, 2011

My First Azure Standard Order!


I totally forgot to mention two of the things I'm most excited about... organic blackberry ice cream and raw cheddar cheese!

Friday, March 11, 2011

Step #1 Proper Hydration, Part 1


*Please don't drink tap water! Filtered water is preferable.

Hydration formula: drink at least 50% of your weight in ounces of water each day (i.e. a person weighing 160 lbs would drink at least 80 ounces of water each day; 8 ounces are in a cup, so 10 cups of water).

Things to look for when considering a pro-biotic:
-at least 5 billion CFU per day for healthy adults
-several different strains of bacteria (mine has 13)
-a potency guarantee

I like to take this Garden of Life pro-biotic from Vitacost.

An Overview of My Plan for this Blog


Step 1 Proper Hydration
Step 2 Getting Enough Rest
Step 3 Snack-time Makeover
Step 4 Breakfast Makeover
Step 5 Lunch Makeover
Step 6 Dinner Makeover

Tuesday, March 8, 2011

Welcome!

This blog is designed to spread helpful information to those interested in learning how to eat healthier. I am not a doctor and any information contained in this blog is either my personal opinion or something I have learned through my research on the topic. Please make your own informed judgment on what works best for you and your family! Your feedback is welcome and if there is a specific topic you would like me to address please leave me a comment. Also, please don't assume that I do everything that I suggest. However badly I would like to feed my family the best at all times, it just doesn't happen. I do the best I can at any given time and I don't feel guilty about my shortcomings. Changing your eating habits can be a difficult process and it takes time, years!, before those changes become second nature to you.

Thanks for stopping by,
Kim